插件化开发入门
创始人
2024-05-29 02:03:01
0次
一、背景
顾名思义,插件化开发就是将某个功能代码封装为一个插件模块,通过插件中心的配置来下载、激活、禁用、或者卸载,主程序无需再次重启即可获取新的功能,从而实现快速集成。当然,实现这样的效果,必须遵守一些插件接口的标准,不能与已有的功能冲突。目前能支持插件化开发的成熟框架很多,但本文仅从思路的实现角度,从0到1实现简单的插件化开发框架。


二、实现思路
思路:定义插件接口 -> 实现插件接口 -> 通过反射机制加载插件 -> 调用插件方法。
开发语言:支持反射机制的所有高级语言均可实现插件式开发,或有 FFI 调用 Native 函数的编程语言。
三、Java 通过反射机制实现插件化开发
1、创建插件接口

定义插件接口:一个执行方法
package service;/*** 通用插件接口** @author yushanma* @since 2023/3/5 16:36*/
public interface IPluginService {/*** 执行插件*/public void run();
}
2、实现插件接口
package impl;
import service.IPluginService;/*** 打印插件** @author yushanma* @since 2023/3/5 16:37*/
public class MyPrinterPlugin implements IPluginService {@Overridepublic void run() {System.out.println("执行插件方法...");}
}

3、插件中心
管理与加载插件。
Step 1、插件实体类封装
package entity;import lombok.Data;/*** 插件实体类** @author yushanma* @since 2023/3/5 16:44*/
@Data
public class PluginEntity {/*** 插件名*/private String pluginName;/*** 插件路径*/private String jarPath;/*** 字节码名字*/private String className;
}
需要获取插件名、插件实现的Jar包路径、字节码路径

Step 2、通过反射机制实现插件实例化
package loader;import entity.PluginEntity;
import exception.PluginException;
import lombok.Data;
import lombok.NoArgsConstructor;
import service.IPluginService;import java.io.File;
import java.net.URL;
import java.net.URLClassLoader;
import java.util.HashMap;
import java.util.List;
import java.util.Map;/*** 插件管理器** @author yushanma* @since 2023/3/5 16:44*/
@Data
@NoArgsConstructor
public class PluginManager {private Map> clazzMap = new HashMap<>();public PluginManager(List plugins) throws PluginException {initPlugins(plugins);}public void initPlugin(PluginEntity plugin) throws PluginException {try {//URL url = new URL("file:" + plugin.getJarPath());URL url = new File(plugin.getJarPath()).toURI().toURL();URLClassLoader classLoader = new URLClassLoader(new URL[]{url});Class clazz = classLoader.loadClass(plugin.getClassName());clazzMap.put(plugin.getClassName(), clazz);} catch (Exception e) {throw new PluginException("plugin " + plugin.getPluginName() + " init error: >>> " + e.getMessage());}}public void initPlugins(List plugins) throws PluginException {for (PluginEntity plugin : plugins) {initPlugin(plugin);}}public IPluginService getInstance(String className) throws PluginException {Class clazz = clazzMap.get(className);Object instance = null;try {instance = clazz.newInstance();} catch (Exception e) {throw new PluginException("plugin " + className + " instantiate error," + e.getMessage());}return (IPluginService) instance;}
}
Step 3、通过 XML 文件来配置管理插件
org.dom4j dom4j 2.1.1 package conf;import entity.PluginEntity;
import exception.PluginException;
import org.dom4j.Document;
import org.dom4j.Element;
import org.dom4j.io.SAXReader;import java.io.File;
import java.util.ArrayList;
import java.util.List;/*** 解析 XML 插件配置** @author yushanma* @since 2023/3/5 16:44*/
public class PluginXmlParser {public static List getPluginList() throws PluginException {List list = new ArrayList<>();SAXReader saxReader = new SAXReader();Document document = null;try {document = saxReader.read(new File("src/main/resources/plugin.xml"));} catch (Exception e) {throw new PluginException("read plugin.xml error," + e.getMessage());}Element root = document.getRootElement();List plugins = root.elements("plugin");for (Object pluginObj : plugins) {Element pluginEle = (Element) pluginObj;PluginEntity plugin = new PluginEntity();plugin.setPluginName(pluginEle.elementText("name"));plugin.setJarPath(pluginEle.elementText("jar"));plugin.setClassName(pluginEle.elementText("class"));list.add(plugin);}return list;}}
测试插件 plugins/PrinterPlugin-1.0-SNAPSHOT.jar impl.MyPrinterPlugin 测试插件 plugins/PrinterPlugin-1.0-SNAPSHOT.jar impl.MyPrinterPlugin Step 4、解析 XML 文件并加载插件
package loader;import conf.PluginXmlParser;
import entity.PluginEntity;
import exception.PluginException;
import service.IPluginService;import java.util.List;/*** 插件加载器** @author yushanma* @since 2023/3/5 16:44*/
public class PluginLoader {public void run() throws PluginException {// 从配置文件加载插件List pluginList = PluginXmlParser.getPluginList();PluginManager pluginManager = new PluginManager(pluginList);for (PluginEntity plugin : pluginList) {IPluginService pluginService = pluginManager.getInstance(plugin.getClassName());System.out.println("开始执行[" + plugin.getPluginName() + "]插件...");// 调用插件pluginService.run();System.out.println("[" + plugin.getPluginName() + "]插件执行完成");}// 动态加载插件
//        PluginEntity plugin = new PluginEntity();
//        plugin.setPluginName("");
//        plugin.setJarPath("");
//        plugin.setClassName("");
//        pluginManager.initPlugin(plugin);
//        IPluginService pluginService = pluginManager.getInstance("");
//        pluginService.run();}
}
4、测试效果
import exception.PluginException;
import loader.PluginLoader;/*** desc** @author yushanma* @since 2023/3/5 16:44*/
public class DemoMain {public static void main(String[] args) throws PluginException {PluginLoader loader = new PluginLoader();loader.run();}
}

四、Rust 通过 libloader 库实现插件化开发
通过 libloader 库可以调用动态链接库函数,需要 FFI 支持。
Step 1、创建 lib
cargo new --lib mydll// 有参数没有返回值
#[no_mangle]
pub fn println(str: &str) {println!("{}", str);
}// 有参数有返回值
#[no_mangle]
pub fn add(a: usize, b: usize) -> usize {a + b
}// 没有参数没有返回值
#[no_mangle]
pub fn print_hello() {println!("Hello");
}// 字符串类型
#[no_mangle]
pub fn return_str(s1: &str) -> &str{s1
}

Step 2、toml 配置编译类型
[package]
name = "mydll"
version = "0.1.0"
edition = "2021"# See more keys and their definitions at https://doc.rust-lang.org/cargo/reference/manifest.html[dependencies]# rlib:Rust库,这是cargo new默认的种类,只能被Rust调用;
# dylib:Rust规范的动态链接库,windows上编译成.dll,linux上编译成.so,也只能被Rust调用;
# cdylib:满足C语言规范的动态链接库,windows上编译成.dll,linux上编译成.so,可以被其他语言调用
# staticlib:静态库,windows上编译成.lib,linux上编译成.a,可以被其他语言调用[lib]
crate-type = ["cdylib"]
Step 3、编译为 dll
cargo build

可以看到,所有的函数都被正常导出,具体原理请参考:https://fasterthanli.me/articles/so-you-want-to-live-reload-rust
Step 4、动态加载 dll
use cstr::cstr;
use libloader::*;
use std::{ffi::CStr,os::raw::c_char};fn main() {get_libfn!("dll/mydll.dll", "println", println, (), s: &str);println("你好");get_libfn!("dll/mydll.dll", "add", add, usize, a: usize, b: usize);println!(" 1 + 2 = {}", add(1, 2));get_libfn!("dll/mydll.dll", "print_hello", print_hello, bool);print_hello();get_libfn!("dll/mydll.dll","return_str", return_str,*const c_char, s: *const c_char);let str = unsafe { CStr::from_ptr(return_str(cstr!("你好 ").as_ptr())) };print!("out {}", str.to_str().unwrap());
}

五、C# 通过反射机制实现插件化开发

Step 1、定义插件接口
namespace PluginInterface
{public interface IPlugin{// 获取插件名字public string GetName();// 获取插件所提供的功能列表public string[] GetFunction();// 执行插件某个功能public bool Execute(string fn);}}
Step 2、实现插件接口
using PluginInterface;
using System;
using System.Linq;namespace MyPlugin
{public class PrinterPlugin : IPlugin{private static readonly string PLUGIN_NAME = "PrinterPlugin";// 获取插件名字public string GetName(){return PLUGIN_NAME;}// 获取插件所提供的功能列表public string[] GetFunction(){return PrinterFunc.FuncDics.Keys.ToArray();}// 执行插件某个功能public bool Execute(string fn){return PrinterFunc.Run(fn);}// 传参功能public static object PrintLabel(string sn){Console.WriteLine($"打印标签{sn}...DONE");return true;}}
}
using System;
using System.Collections.Generic;namespace MyPlugin
{// 封装打印机支持的功能internal class PrinterFunc{// 功能字典public static Dictionary> FuncDics = new Dictionary>{{"PrintPhoto",PrintPhoto },{"PrintDoc",PrintDoc }};// 执行某个功能public static bool Run(string name){if (!FuncDics.ContainsKey(name)){return false;}return (bool)FuncDics[name].Invoke();}// 打印照片public static bool PrintPhoto(){Console.WriteLine("打印照片...DONE");return true;}// 打印文档public static bool PrintDoc(){Console.WriteLine("打印文档...DONE");return true;}}}
Step 3、通过反射实例化插件
using PluginInterface;
using System;
using System.Collections.Generic;
using System.IO;
using System.Reflection;namespace CLI.Loader
{public class PluginLoader{// 初始化时加载插件public PluginLoader(){LoadPlugin();}public Dictionary ListName = new Dictionary();// 加载所有插件public void LoadPlugin(){try{// 清除所有插件缓存ListName.Clear();// 插件文件夹string fileName = "D:\\AwsomeWorkSpace\\CLI\\Plugins\\net5.0\\";// 获取所有插件文件DirectoryInfo info = new DirectoryInfo(fileName);FileInfo[] files = info.GetFiles();foreach (FileInfo file in files){if (!file.FullName.EndsWith(".dll")){continue;}// 通过反射机制创建插件实例Assembly assembly = Assembly.LoadFile(file.FullName);Type[] types = assembly.GetTypes();foreach (Type type in types){// 如果某些类实现了预定义的插件接口,则认为该类适配与主程序(是主程序的插件)if (type.GetInterface("IPlugin") != null){// 创建该类实例IPlugin plugin = assembly.CreateInstance(type.FullName) as IPlugin;if (plugin == null){throw new Exception("插件错误");}ListName.Add(plugin.GetName(), plugin);// 调用插件的某个传参方法MethodInfo printLabel = type.GetMethod("PrintLabel");object res = printLabel.Invoke(plugin, parameters: new object[] { "HQ31122222222222" });Console.WriteLine(res?.ToString());// 调用插件内部的 Execute 方法MethodInfo execute = type.GetMethod("Execute");res = execute.Invoke(plugin, parameters: new object[] { "PrintPhoto" });Console.WriteLine(res?.ToString());res = execute.Invoke(plugin, parameters: new object[] { "PrintDoc" });Console.WriteLine(res?.ToString());}}}}catch (Exception e){Console.WriteLine(e.Message);}}// 插件启动public void Start(){Console.WriteLine("==== 插件中心 ====");Console.WriteLine("1--加载插件列表");Console.WriteLine("2--重新刷新插件");int switchVal = int.Parse(Console.ReadLine());switch (switchVal){case 1:GetPluginList();break;case 2:LoadPlugin();break; ;}}// 加载插件列表public void GetPluginList(){Console.WriteLine("--------插件列表--------");foreach (var VARIABLE in ListName.Keys){Console.WriteLine($"----{VARIABLE}");}Console.WriteLine("--------请输入插件名--------");GetPluginFunc(Console.ReadLine());}// 加载插件功能public void GetPluginFunc(string pluginName){if (!ListName.ContainsKey(pluginName)){return;}IPlugin plugin = ListName[pluginName];string[] funcList = plugin.GetFunction();for (int i = 0; i < funcList.Length; i++){Console.WriteLine(funcList[i]);plugin.Execute(funcList[i]);}}}
}

ok,可以看到,插件化开发的实现并不复杂,但是其中用到的反射机制会消耗部分性能,并且 dll 也会存在一些逆向工程或者反向注入等信安问题,需要谨慎使用。当然,框架的完善更是任重道远的过程。
六、.NET 6/7 导出非托管函数能力
环境:Visual Studio 2022 / .NET7
参考:https://github.com/dotnet/runtime/tree/main/src/coreclr/nativeaot/docs
Step 1、创建类库项目
dotnet new classlib -o mydll -f net6.0Step 2、配置 AOT Native
net7.0 enable enable true Step 3、导出非托管函数
using System.Runtime.InteropServices;
using Seagull.BarTender.Print;namespace ClassLibrary1
{public class Class1{// 无参数有返回值[UnmanagedCallersOnly(EntryPoint = "IsOk")]public static bool IsOk(){return true;}// 有参数无返回值[UnmanagedCallersOnly(EntryPoint = "MyPrinter")]public static void MyPrinter(IntPtr pString){try{if (pString != IntPtr.Zero){string str = new(Marshal.PtrToStringAnsi(pString));Console.WriteLine(str);}}catch (Exception e){Console.WriteLine(">>> Exception " + e.Message);}}// 有参数有返回值[UnmanagedCallersOnly(EntryPoint = "MyConcat")]public static IntPtr MyConcat(IntPtr pString1, IntPtr pString2){string concat = "";try{if (pString1 != IntPtr.Zero && pString2 != IntPtr.Zero){string str1 = new(Marshal.PtrToStringAnsi(pString1));string str2 = new(Marshal.PtrToStringAnsi(pString2));concat = string.Concat(str1, str2);}}catch (Exception e){concat = e.Message;}return Marshal.StringToHGlobalAnsi(concat);}// 无参数无返回值[UnmanagedCallersOnly(EntryPoint = "PrintHello")]public static void PrintHello(){Console.WriteLine(">>> Hello");}}
}
Step 4、查看导出结果
dotnet publish /p:NativeLib=Shared /p:SelfContained=true -r win-x64 -c release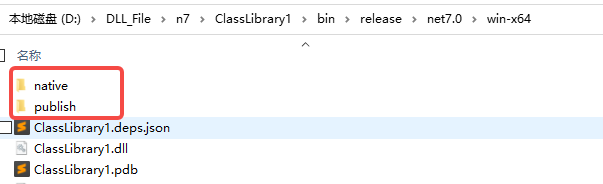
可以看到 native 、publish 文件夹,里面的 dll 文件

函数正常导出,最后一个是默认导出的函数。
相关内容
热门资讯
校园迎新春晚会主持词
校园迎新春晚会主持词 主持词已成为各种演出活动和集会中不可或缺的一部分。在当今不断发展的世界,越来...
文艺汇演主持人串词
文艺汇演主持人串词 开场: 萌:尊敬的各位领导,各位来宾。 泓:亲爱的老师们,同学们。大家 ...
年度总结表彰大会主持词
年度总结表彰大会主持词9篇 总结是指社会团体、企业单位和个人在自身的某一时期、某一项目或某些工作告...
小学庆六一儿童节主持词
小学庆六一儿童节主持词(精选5篇) 契合现场环境的主持词能给集会带来双倍的效果。随着社会一步步向前...
经销商大会主持稿
经销商大会主持稿推荐 经销商大会主持稿(一) 尊敬的各位来宾,各位朋友 大家上午好 (8:5...
年会精彩致辞
年会精彩致辞(通用7篇) 在学习、工作乃至生活中,大家对致辞都不陌生吧,致辞具有很强的实用性和针对...
少儿活动主持人主持词
少儿活动主持人主持词 主持词需要富有情感,充满热情,才能有效地吸引到观众。我们眼下的社会,主持人参...
晚会主持词开场白
【必备】晚会主持词开场白(通用13篇) 主持词已成为各种演出活动和集会中不可或缺的一部分。在人们越...
六一儿童节鼓励致辞
六一儿童节鼓励致辞(通用20篇) 无论是身处学校还是步入社会,说到致辞,大家肯定都不陌生吧,致辞具...
幼儿园元旦联欢会主持词
2014年幼儿园元旦联欢会主持词2014年幼儿园元旦联欢会主持词1师:尊敬的各位老师幼:亲爱的小朋友...
同学会联欢会主持词
同学会联欢会主持词 借鉴诗词和散文诗是主持词的一种写作手法。在一步步向前发展的社会中,越来越多的活...
搞笑脱口秀台词脱口秀台词
搞笑脱口秀台词脱口秀台词1100字校园脱口秀台词每天,当我的双脚迈入合肥七中的大门,强相互作用会把我...
学生会换届大会主持词
学生会换届大会主持词 主持词的内容 主持词一般由开场白、中间部分与结束语组成。 开场白 演出或...
教研活动公开课主持稿
教研活动公开课主持稿 篇一:数学教研活动主持词 各位领导、各位老师,大家好! 在这样一个春...
《花木兰》感人台词
《花木兰》感人台词 壹 孝,替父从军父女情 感人段落:军令如山,花弧爱国心切,无奈年老气衰,百病...
红歌赛主持词
红歌赛主持词 由主持人于节目进行过程中串联节目的串联词。如今的各种演出活动和集会中,主持人往往成了...
联欢晚会主持词
联欢晚会主持词3篇 主持词可以采用和历史文化有关的表述方法去写作以提升活动的文化内涵。在如今这个时...
金榜题名主持词
金榜题名主持词(精选23篇) 主持词要根据活动对象的不同去设置不同的主持词。随着社会一步步向前发展...
光荣退休领导致辞
光荣退休领导致辞范文(通用5篇) 在学习、工作或生活中,要用到致辞的情况还是蛮多的,致辞是指在仪式...
大学迎新晚会主持词
大学迎新晚会主持词 迎新,全称迎接新春,又叫迎接新年。迎新是中国的传统节日形式。或者欢迎、迎接新来...